In this game, a dungeon would be considered 'completed' if you've collected all of the inventory items from within it, defeated the boss of the dungeon, collected the Heart Container, and collected the Triforce Shard at the end of the dungeon. Of course, the case of Death Mountain, you would rescue Zelda instead of collecting a Heart Container or Triforce Shard. But this does mean that there are some things you don't have to do to complete a dungeon: You don't have to visit every room, collect any specific Keys, Rupees, Bombs, Maps, or Compasses. You don't have to defeat mini-bosses (defined as a boss-like enemy that does not drop a Heart Container), or purchase the Bomb upgrades. However, unless there is no possible way to do so, we're ruling that a dungeon must be completed in one trip: You cannot enter, grab an item from the dungeon, and then come back after using that item to complete three other dungeons!
So first, let's take a look at the First Quest map, taken from http://www.coolvideogamestuff.com
 |
| Right-click the image to view its original, full size. |
The nine dungeons are located at the following locations on this map:
- The Eagle - The island in the center of the map.
- The Moon - The forest a few screens east of The Eagle.
- The Manji - East of the brown forest in the south-west area of the map.
- The Snake - The island west of The Eagle.
- The Lizard - The mountains in the north-east area of the map.
- The Dragon - East of the graveyard.
- The Demon - Under the pond east of the graveyard, two screens south of The Dragon.
- The Lion - Behind the tree in the middle of the eastern forest.
- Death Mountain - Under the leftmost rock in the north-west area of the map.
- To access The Snake, we need to use the Raft to reach the island.
- To access The Demon, we need to use the Whistle to dry up the lake and create the dungeon entrance.
- To access The Lion, we need to use a Candle to burn the tree.
- To access Death Mountain, we need to use a Bomb to blow up the rock.
GLITCH TIME!
So let's take a look at a well-known glitch in the game, Screen Wrapping.
Video taken from ZeldaSpeedRuns.
The Screen Wrap glitch lets you immediately cross from the left side of the screen to the right or vice versa. Though it's not shown in the video, you can also use it to cross from the top of the screen to the bottom, or from the bottom to top. Can we use this to access one of these dungeons early?
Since the entrance to The Demon doesn't even exist until the Whistle is used, Screen Wrapping will be of no help here. So let's take a closer look at the area around The Snake.
The left and right sides of that island are each one layer of water tiles followed by one layer of mountain tiles, neither of which Link can normally cross. What this means is if you Screen Wrap towards The Snake from the left or right, you'll be stuck behind the mountain tiles and unable to actually walk onto the island, and will have to reset your game. The north side of this screen is bordered by two mountain tiles as well, so Screen Wrapping from the screen above the island would have the same result (However, you can't actually Screen Wrap from that screen anyway! One step of Screen Wrapping up or down is to move left or right for one frame, and Link cannot move any distance left or right while on a staircase. Unfortunately, the only path up from that screen is a staircase).
So our last hope is Screen Wrapping up from the screen south of the island. Fortunately, you can use the Screen Wrap glitch from this screen! Unfortunately, instead of reappearing at the top of the screen, Link will just stand in place 'below' the bottom of the screen where you cannot see him (I'm not positive, but I imagine this has something to do with the game's internal flag for the dock on this screen). What this means is, no, there is no known way to access The Snake before getting the Raft.
In addition, Screen Wrapping cannot be used in dungeons for the same reason it cannot be used on staircases: The dungeon's doors are exactly wide enough for Link to cross through them, so you cannot move yourself up/down or left/right the tiny amount you need to in order to Screen Wrap.
So knowing that glitches will not be useful to us, let's take a look at what we'll need to complete each dungeon.
ANALYSIS
The following dungeon maps are all taken from http://www.nesmaps.com
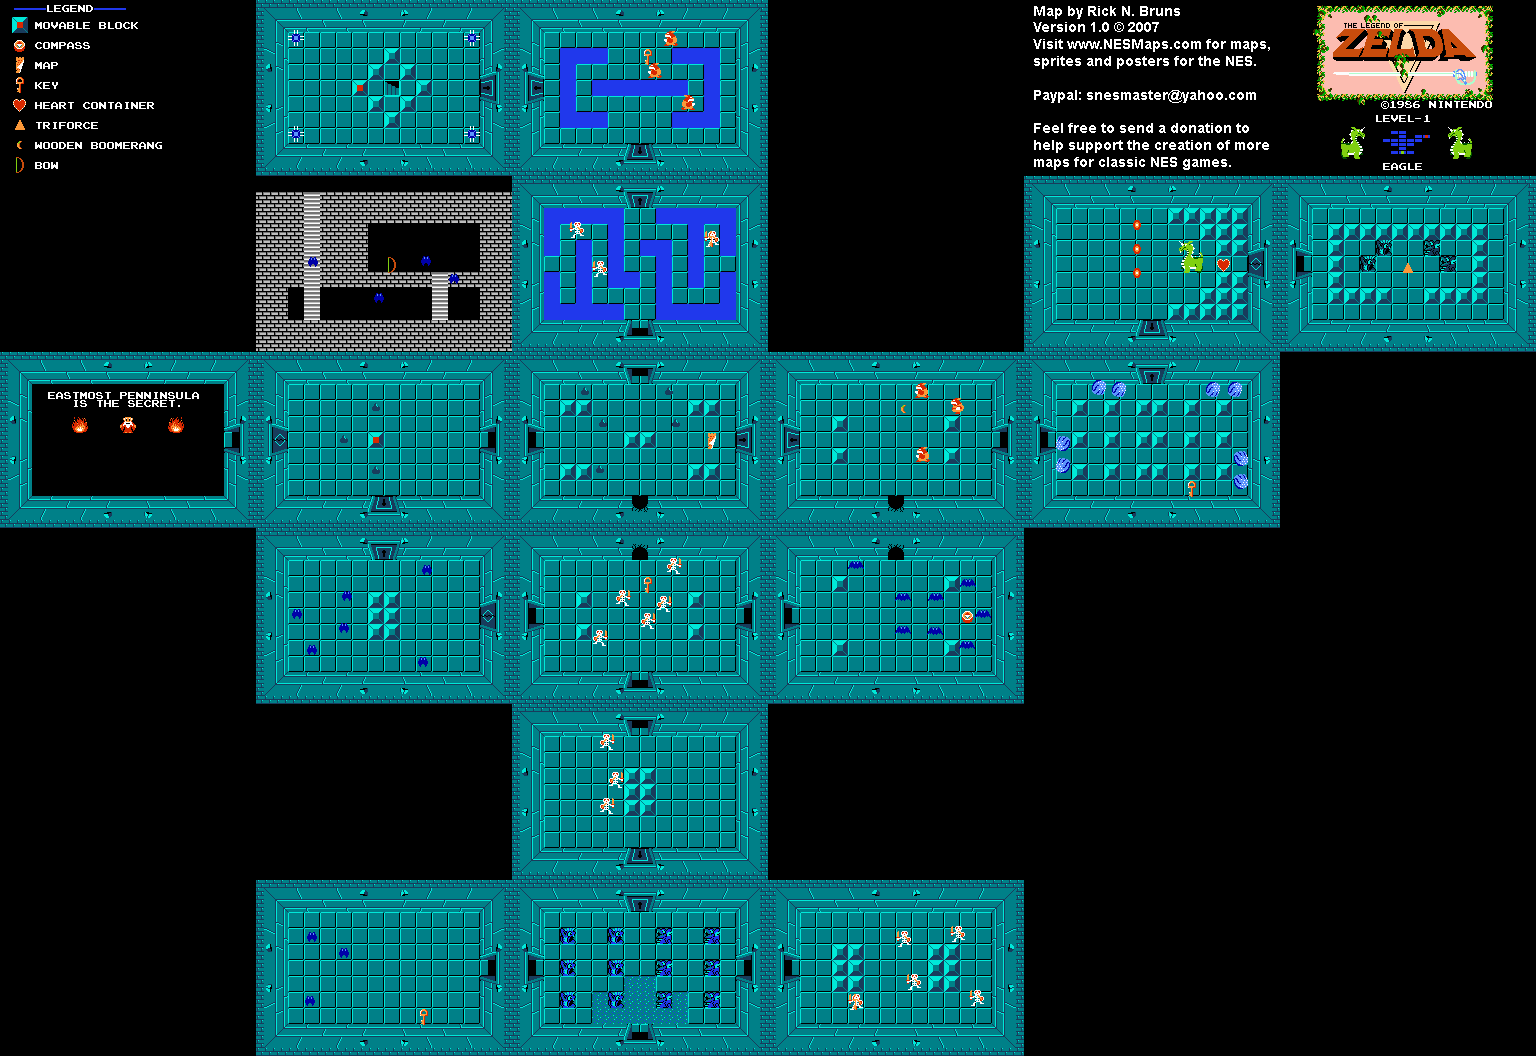
Aside from a Sword (or hell, even with a Candle and Bombs instead of a Sword, if you want), we don't need any special items to collect the Bow and the Boomerang, defeat Aquamentus, and collect the Heart Container and Triforce Shard. We could even easily pick up the Map and Compass if we wanted.

We just need some Bombs (to kill the boss, Dodongo) and a Sword to complete this dungeon, but we can find Bombs on the overworld and in shops. Collecting the Magical Boomerang, Heart Container, and Triforce Shard is easy here.

Bringing in Bombs or the White Sword would be helpful, but not needed. Just the Sword is required again to collect the Raft, defeat Manhandla, and collect the Heart Container and Triforce Shard.

Though we need the Raft to access this dungeon, we don't need any other items to complete it: The Blue Candle and Bombs might be helpful, but are unnecessary. With just the Sword, we can access the Ladder, and we can choose to fight the Manhandla mini-boss or just use the Bombs to go around it. We'll need to use the Sword to defeat Gleeok though, and collect its Heart Container and Triforce Shard.

We need to bring in Bombs to collect the Whistle in this dungeon, and we'll need to use the Ladder to access the boss. We could collect the Bomb upgrade if we want, but there's no need to: We just need to defeat Digdogger and collect its Heart Container and Triforce Shard.

The Ladder is needed to reach the boss, and the Bow and Arrow are needed to defeat Gohma: No other weapon will affect it. Gleeok can be skipped though, with a bomb in the room beneath it. Fortunately, the Magic Rod can be collected without any other special items.
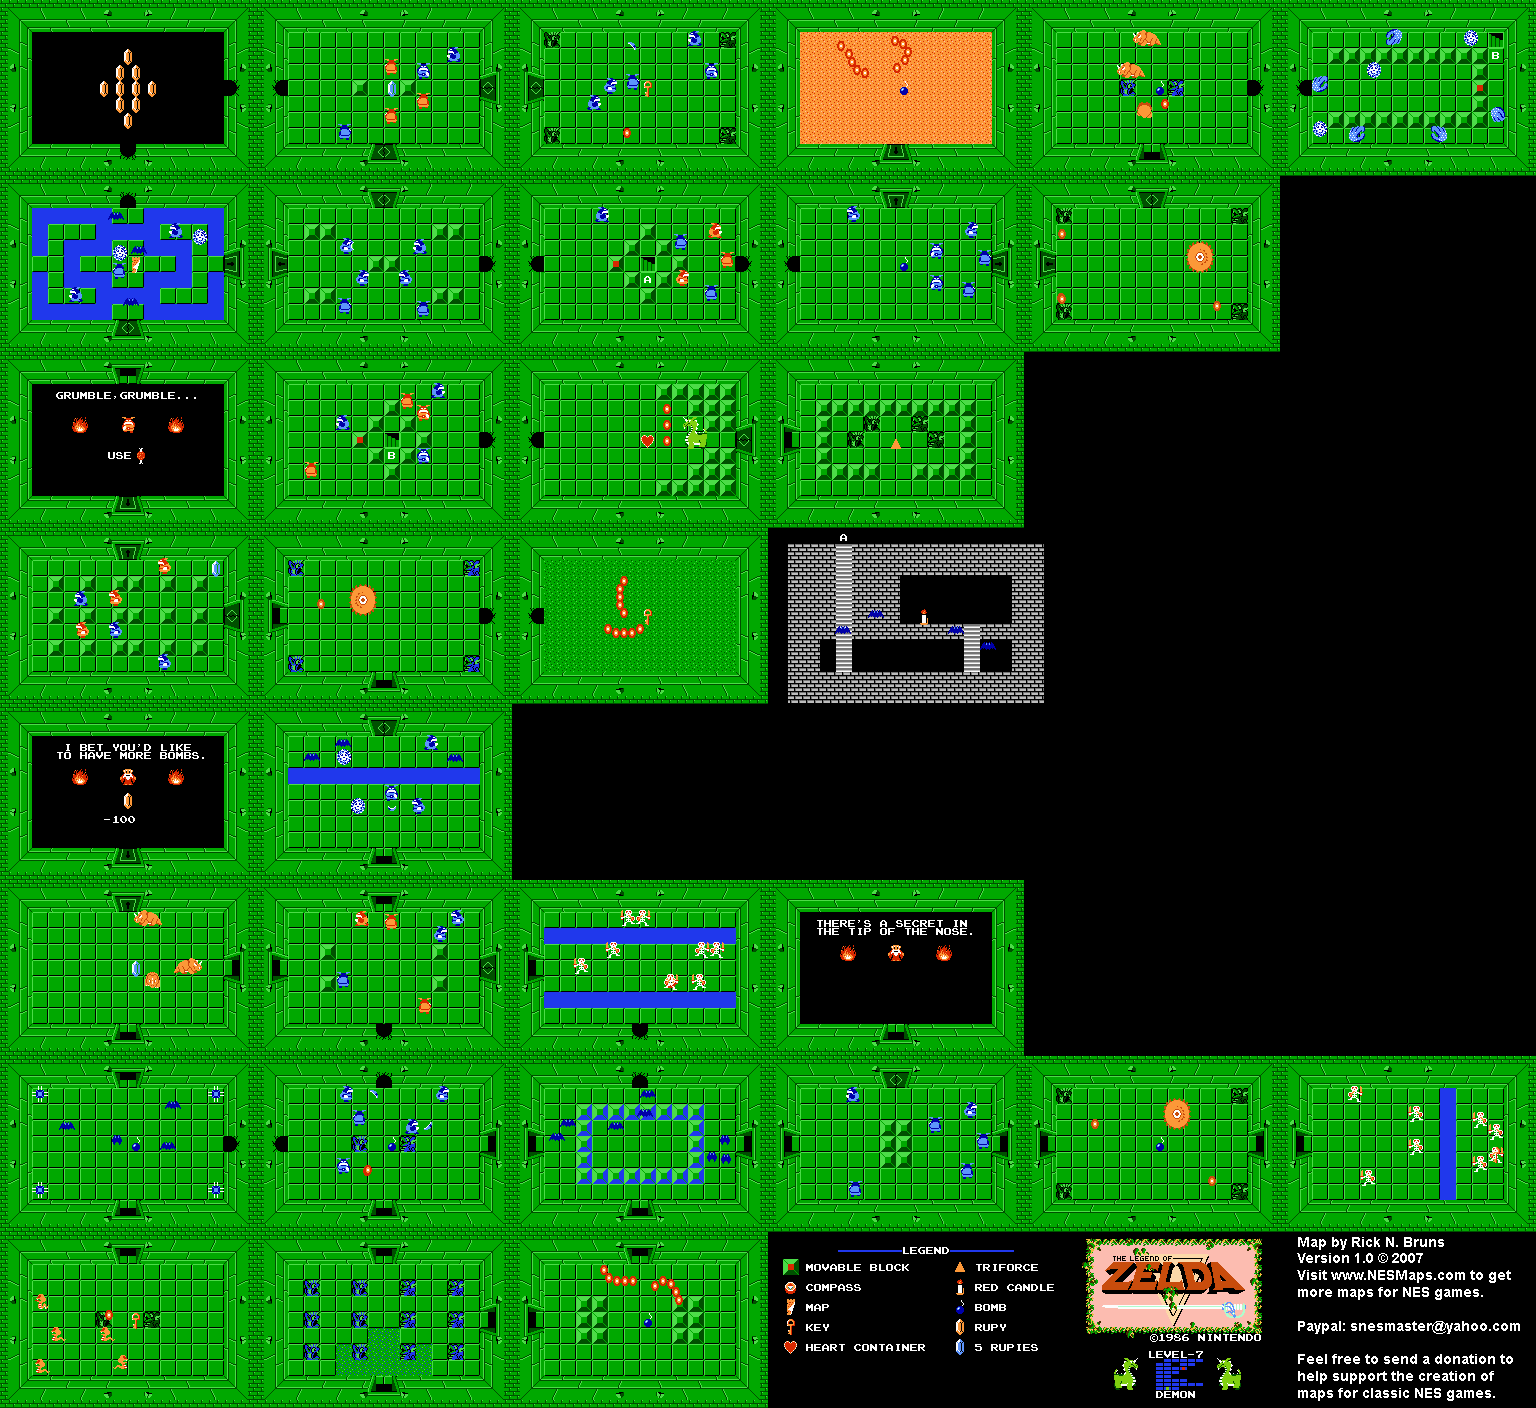
The Whistle is needed to access this dungeon, and Bombs are needed throughout it. Aside from that, you'll need to buy some Bait from the overworld to get past the hungry Goriya, and the Ladder to cross some rivers. Aside from using the Whistle to kill a Digdogger in your way, those are the only items needed to collect the Red Candle, defeat Aquamentus, and grab its spoils.
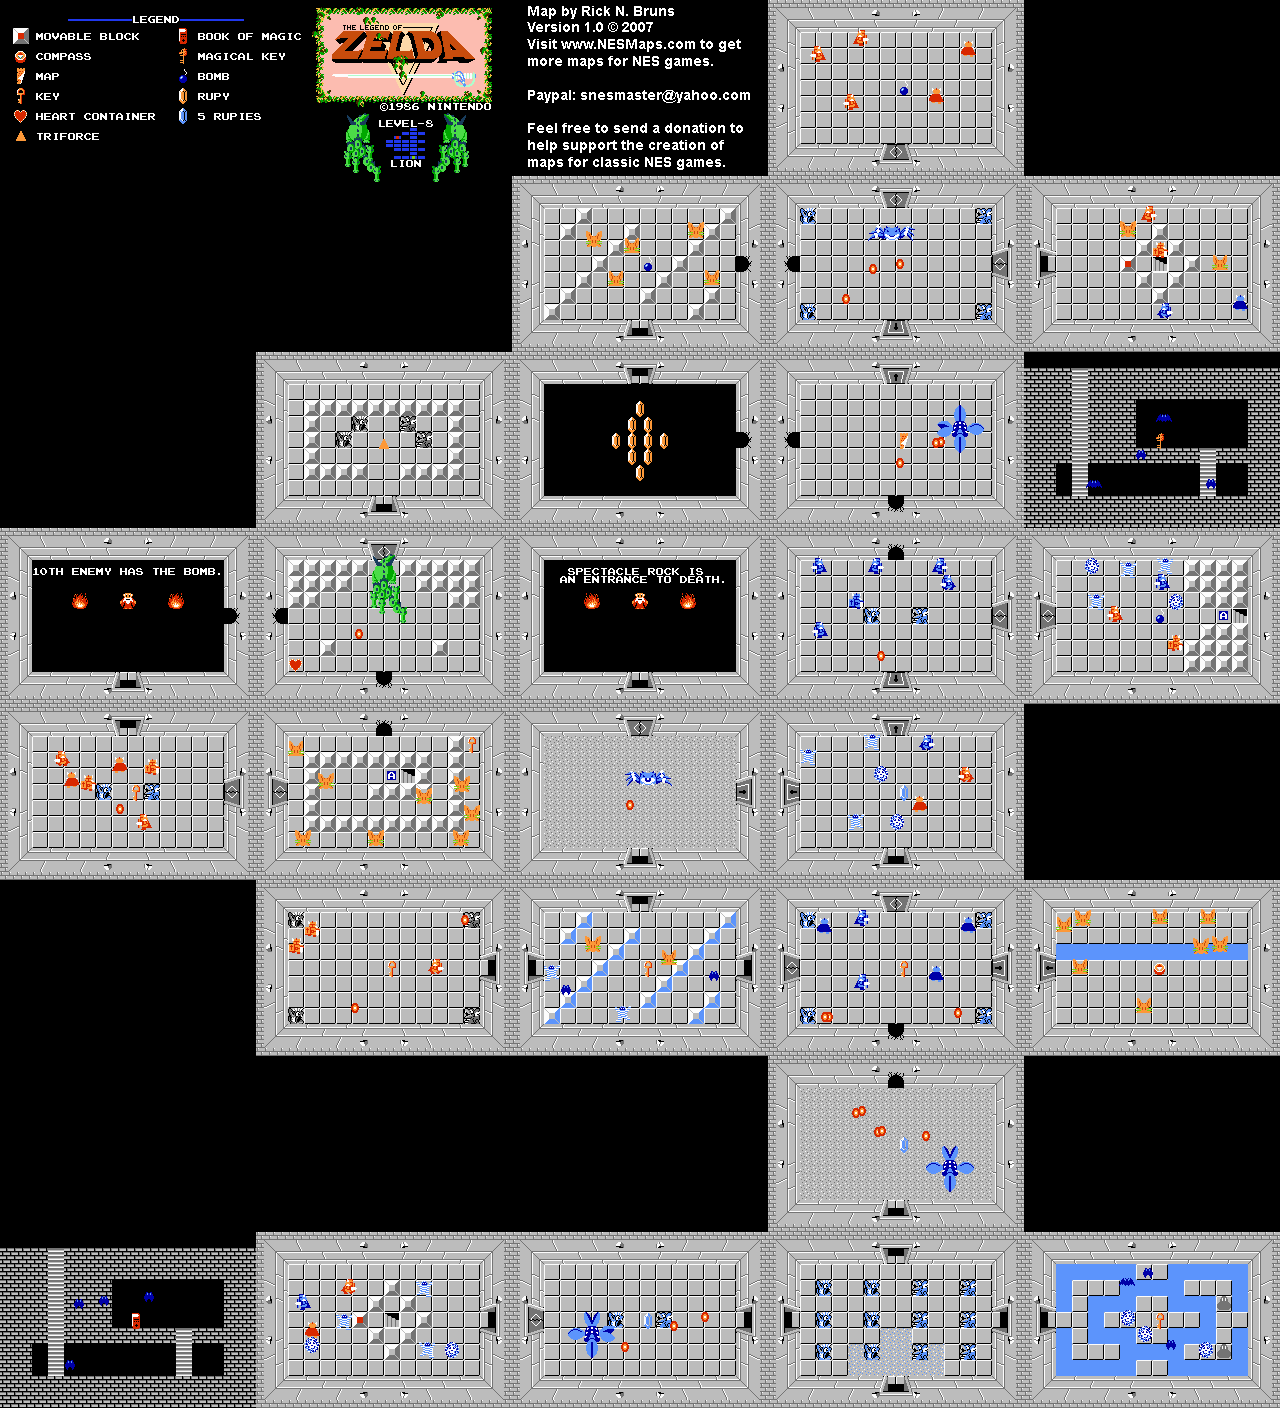
We just need a Candle to access this dungeon, though we will have to fight all three Manhandla mini-bosses to get all of the treasures in here. Also, we can easily grab the Book of Magic and get to the boss, Gleeok, right away to grab its Heart Container and Triforce Shard. The only issue is that a Blue Gohma is guarding the way to the Magical Key, so we'll need to bring a Bow and Arrow to defeat it.

An old man blocks the way into the dungeon, and won't let you pass its second room unless you have all eight Triforce Shards, forcing you to complete this dungeon last. Aside from that though, the only items we really need to use in this dungeon are Bombs (to blow open passages in certain walls), the Bow and Silver Arrow (to defeat Ganon), a Sword (to attack Ganon), and either two spare Keys or the Magical Key. With only those items, we could theoretically collect the Red Ring and Silver Arrows, defeat Ganon, and save Zelda, if only we could glitch into the main part of the dungeon early. So if we ever manage to get into this dungeon without all of the Triforce Shards, we'll only need to complete The Eagle for the Bow before finishing the game.
FINAL RESULTS!
- From the start -> The Eagle, The Moon, The Manji
- After The Eagle -> The Lion
- After The Manji -> The Snake
- After The Snake -> The Lizard
- After The Lizard -> The Demon
- After The Eagle and The Snake -> The Dragon
- Last -> Death Mountain
No comments:
Post a Comment